

…Take A Class and Try Again!
Macarons with Espresso Chocolate Ganache Filling
For those of you who recall my previous post: Third Times A Charm I’ve been on what I like to call, a Macaron Mission. With really only 4 ingredients (Almond Flour, Granulated Sugar, Powdered Sugar and Egg Whites) you would think that Macarons are strait forward, quick and easy. Well, you’d be wrong. The hardest part really is finding out which method works best for you. The method that works for me may not work for you. You may have luck with the Italian meringue, but not the French meringue and there are SO many varieties of making this “simple” cookie.
With that said, I did have some luck a couple of months ago, but looking back at the process, it was definitely a little bit of luck. So, I started really getting into understanding how the ingredients work on their own, what happens when you put them together and why it is so specific. On my Instagram I posted a picture of a new book I bought Les Petits Macaron written by Kathryn Gordon and Anne E. McBride. I would highly recommend this book for anyone interested in truly learning the inner workings of Macarons.

Just after reading through this book, a couple of times, I was browsing the Institute of Culinary Education website for their night class onions (GREAT classes at ICE that can be found HERE) and came across a Macaron class being taught by Kathryn Gordon. Needless to say, I was SO excited!! So, like a little kid in Disney World at the Disney Pricess breakfast (yes, that’s how I felt) I brought my book with me to take notes and have Chef sign it.
The best part about the class, other than feeling confident in my Macaron skills was that Chef Kathryn confirmed a lot of what I came to learn that there really is no “Holy Grail” of Macaron recipes. I had such a great time at the class and I learned so much that I couldn’t wait to put it to action and update/refresh my older blog post. Here’s a picture of the Macarons we all made in class:

I hope that you enjoy this “refreshed” version of my Macarons and if anything I hope you take away the confidence to give these amazing cookies a shot! They are totally worth it and once you get a standard base recipe for yourself, you’re truly limitless in what you can create!
Macarons
Prep Time Cook Time Total Time
30 Min 9 Min 1 Hour
_____________________________________________________________
Yields: 40 1-inch Macarons (80 halves)
Ingredients
Before we jump right into the instructions, there are some key things you should know about Macarons that can help with troubleshooting and understanding how theses tricky little cookies react:
- Most importantly — Macarons HATE water. That’s why the old saying of “don’t make Macarons in the rain” really is true! The moisture in the air will ruin the structure that the Macarons have. With that said, of course people make macarons when its raining outside, but don’t do it on your first try. Wait for a sunny and dry day.
- To follow up on the water issue — Egg Whites. Egg whites consist of protein and water and what the Macarons really want from the egg whites are the protein. This is why it’s important to “age” your egg whites. When you separate your whites from your yolks and let the whites sit separately, the water will start to evaporate and you’re left with the the protein; “the good stuff”! For my Macarons, I separated the eggs 2 days in advanced and left them in a bowl in the fridge. When I was ready to make the Macarons, I took them out of the fridge and let the whites come to room temperature on their own. About an hour. People do leave their whites out of the fridge and age them for days, weeks, even months, but to be safe, I like the fridge and just let them come to room temp on their own. Worked great for the Macarons I made in this post!
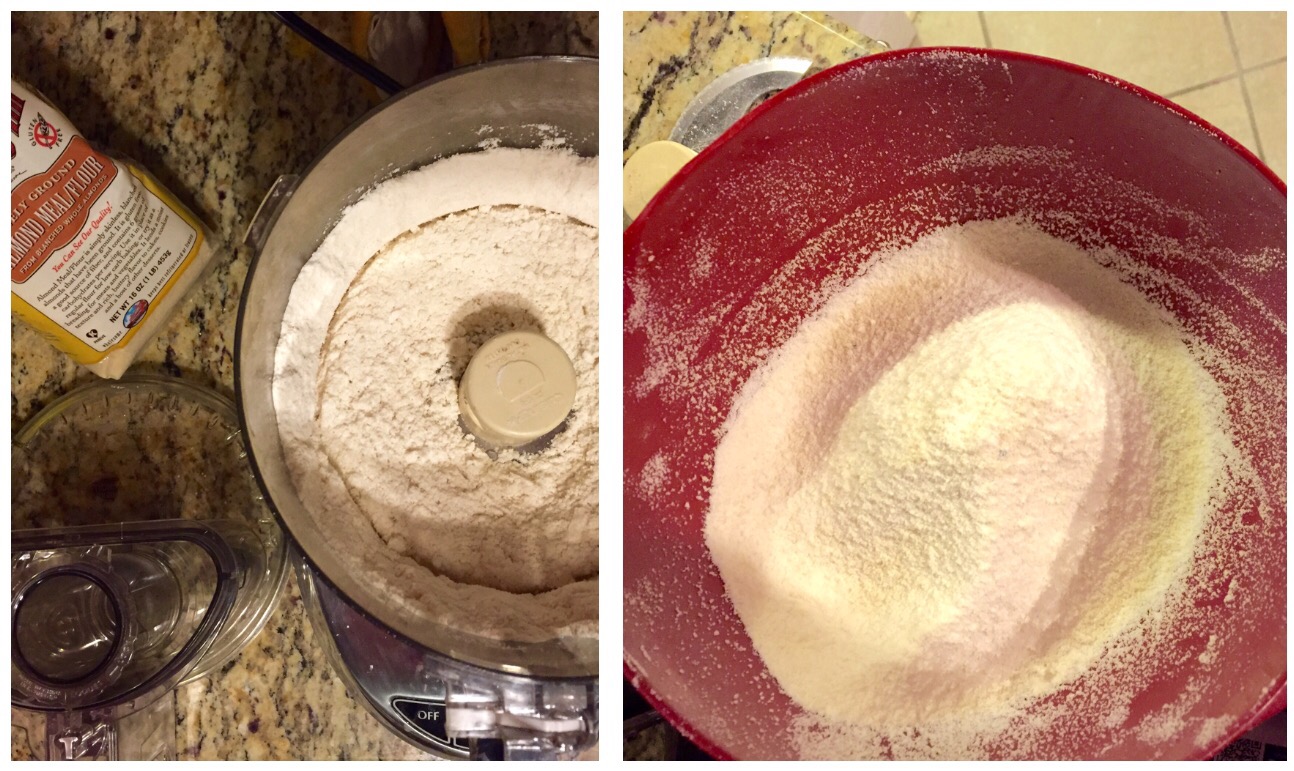
- All about the Flour: Flour is the most important of the dry ingredient. What’s so interesting about these cookies is that you can use any type of nut flour to accomplish the flavor/color/theme you’re after. If you want that really white color, use coconut flour; green, use pistachio. You can also mix flours to save money! The most basic is the almond flour. You want the flour very fine, but if it feels like corn starch it’s too thin and won’t work.
- Sift, Sift Sift! This is so important. To get that smooth top of the macaron cookie it is so important to mix the dry ingredients well, make it fine and get all the clumps out. To do this, use a food processor to thin out the flour and the sifter to blend the confection sugar with the flour and ensure no clumps.
- Food Coloring: Be careful! The gel food coloring is water based, and remember Macarons HATE water. Only add up to 5 or so drops. This will be enough to get you the pastel colors. You see some of the vibrant colors of macarons and those can be accomplished with powdered food coloring. The only downside to the powder is if you use too much of it, it can change the whole flavor of the macaron and can actually give it a very acidic aftertaste that most people really don’t like. Be aware and conscious of it.
- The Meringue: This is the “tricky” part and the part that has a huge variety of methods. Italian, French, Swis, and variations on each. The key here really is just not to over whip. If you over whip you’ll end up with an explosion at the top of the cookie. Just whip until it gets glossy and you can hold the bowl upside down over your head without anything falling out on top of you! Quite a test, right!?
- The Macaronner: This is were you are right before you’re about to pipe. You made the meringue, you’ve added your dry ingredients and stirred to combined. I call this the “lava” stage. You know you’re here when you lift and drop some of the mixture back in the bowl and the “pattern” dissapears back into the mixture. When this happens, you’re ready to pipe!
Phew… OK, with that, we’re ready! It sounds like a lot, but once you understand what makes Macarons tick, you can start to pinpoint where the successes are and what parts need improvement. Don’t be scared, dive in and have fun with them!
Instructions
- You will be baking your Macarons on 2 stacked sheet pans. This will help disperse the oven is heat during baking. So go ahead and stack two baking sheets and line with parchment or a Selpat. As you can see from the picture below, I place sheets of paper with the Macaron size I want underneath so that I am sure to pipe out the same size so they cook evenly.

- Place the almond flour, confectoners’ sugar and salt in the bowl of a food processor and pulse 4 times for 4 seconds to combined. After each pulse, make sure to scrape down the sides of the food processor. This is preventing the flour from overheating in the processor. Once you’re done processing, sift the ingredients together

- Stir together the meringue powder and granulated sugar together
- Place the egg whites and sugar together in a standing mixer set with the whisk attachment. Whisk on medium-high speed until glossy medium peaks form (roughly 11 minutes, but everyone’s mixer is different)

- Using a rubber spatula, fold the almond flour mixture into the meringue until they are well incorporated. At this point add any of the flavoring and color you’re using and fold again, but like I said above, be careful not to add too much! It is important to fold the different components just enough, but not too much or the macaron tops will crack when they’re in the oven. Be sure to follow #7 from the tips above. You can see from the pictures below the progression of the batter.

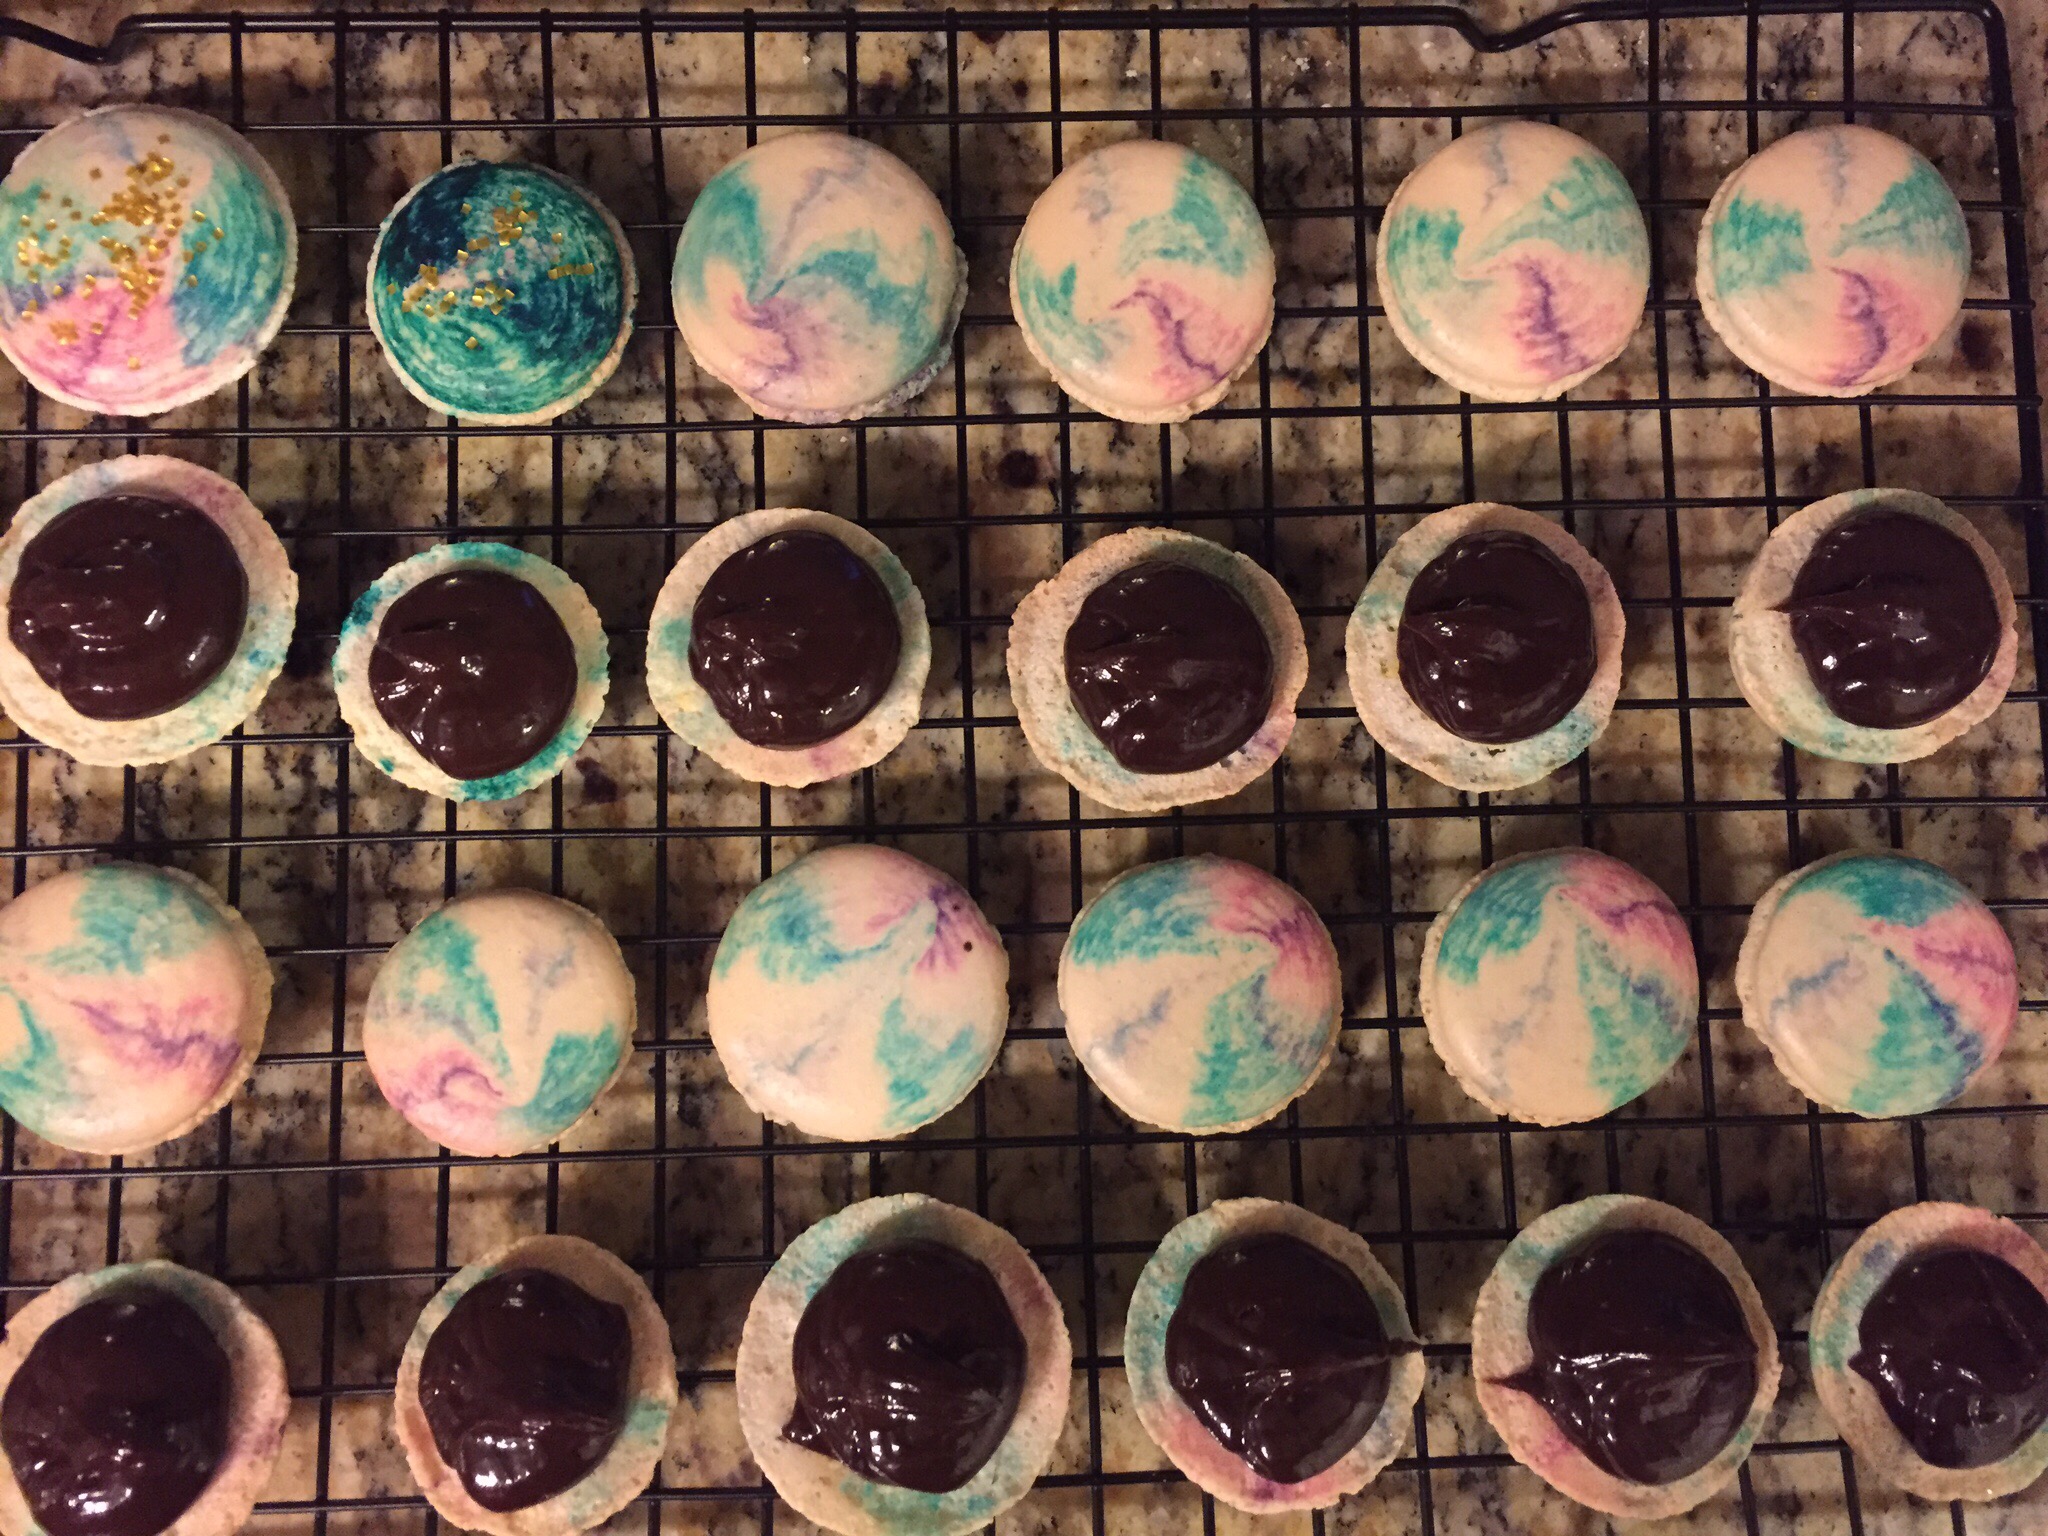
- Spoon the batter into a half full pastry bag fitted with a 1/4 round inch tip. To achieve the tie-died colorful look that I achieved, before you fill the pastry bag, paint stripes from the tip to about halfway up the bag with the colors you want. As you pipe, the batter will pull the colors with it.

- To pipe the Macarons hold your piping bag just above the tip with your dominant had and clos the top so no filling comes out with your other hand. Position the bag at 90 degrees, strait above where you are piping, about inch away from the baking sheet. Squeeze out the batter without moving the piping bag at all! That is very important so that you get a perfectly round macaron. Once you have the size you want, let the pressure on the bag go and without lifting the bag, simply move over to the next area and repeate the process until the batter is gone

- Once all of the Macarons are piped, slam baking sheet onto the counter about 11 times. Don’t be shy, really slam it!! Then, let the Macarons sit on the counter for roughly 15 minutes, until a skin forms. While these are forming the skin, preheat the oven to 350 degrees.
- Bake the Macarons for 9 minutes, until they just come off the parchment paper when you lift them. If you find that the first batch comes out a little short with minimal feet, try taking the temperatre down 25 degrees and add 1 minute to the cooking time, and visa versa if the feet are too big.

- Cool the Macarons completely before removing. If possible, place in the freezer for 10 minutes for easy removal.


Now, for the filling! There are SO many variations of filling. Truly, the options are endless, just use your imagination! I kept it simple this time around with a Cappuccino Ganache Filling. The strong rich flavoring was a perfect compliment for the simple flavoring of the almond cookie. Also, I LOVE chocolate and coffee, so when they’re combined, I just can’t say no!
Cappuccino Ganache Filling
Prep Time Cook Time Total Time
5 Min 10 Min 20 Min
__________________________________________
Yields ~3.5 Cups
Ingredients
- 3 Grams (1 Large Tbs) of Espresso Powder
- 1/4 Tsp of Ground Cinnamon
- 240 Grams (~ 1 Cup) of Heavy Cream
- 320 Grams (~2 Cups) of Semisweet Chocolate, chopped into small pieces
Instructions
- Steep the espresso and cinnamon in the cream as it comes to a boil in a small pot
- Once it boils, turn off the heat and immediately pour over the chocolate in a shallow pan
- Let sit for 1 minute and then whisk from the center out to the edges until smooth and shiny
- Cool in the pan until thick/spreadable as a filling. You can place in the fridge as well to help the process along


It’s that simple!!
Now to combine the Macarons. Once they are cooled, pair each with another of the same size. Line them up with one facing up and once facing down

Fill a piping bag half way with your filling and begin to pipe the filling onto each macaron half facing up. Use the same technique you used to pipe the macaron out for practice!
Take the top half of the marathon cookie place on top of the filling, press lightly an twist a little so that the filling comes just short of the edge.

Now, finally, after all that work, ENJOY!!! Take a bite of these fabulous little cookies you worked so hard on!

– Kristin


