Tag Archives: Baking

Manhattan in the Fall

1 Oct

The Best Time of Year

Fall is hands down my favorite time of year in the City. It’s nice enough to sit outside in a cozy sweater with a glass of wine without the heat of summer on the pounding on the pavement (aka: the stench of garbage on the streets). Farmers markets have all the BEST things: apples, pumpkins, pears, squash, etc. and this only means… It’s time to break out the nutmeg, cinnamon and delicious spices that I LOVE to bake with! While it is unseasonably warm and muggy on this last day of September, I’m totally ready for a hearty slice of pumpkin bread for breakfast!

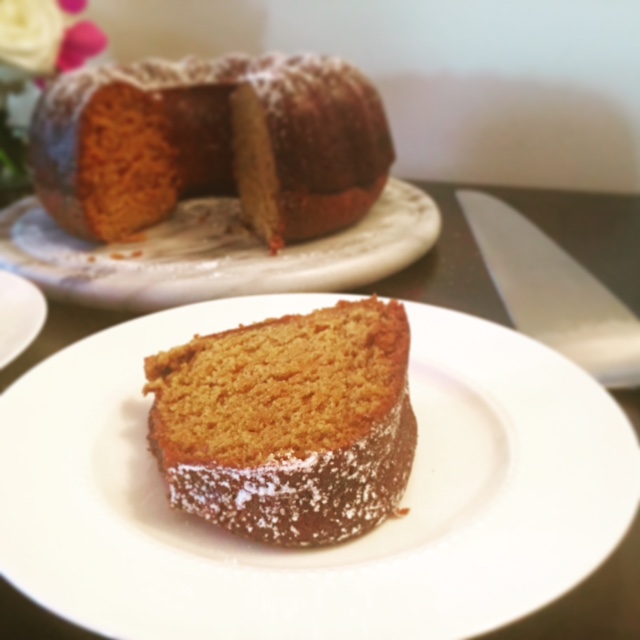
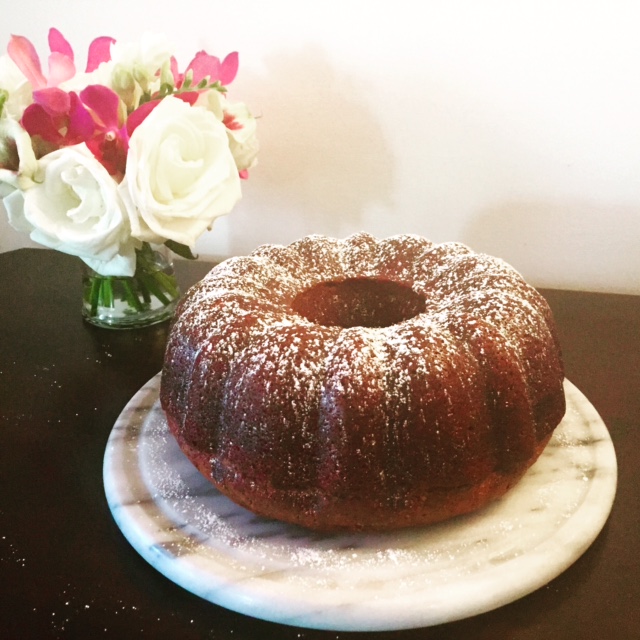
My original plan was to make two loaves of pumpkin bread: 1 for Rob to bring to his office and 1 for me to bring to my office. Well, as usual, in my small NYC apartment, I somehow misplaced my 2nd bread pan, so to improvise, I made a bundt cake!  That’s what’s great about this recipe, it can be used to make so many varieties of pumpkin goodness: bread, bundt cake and cupcakes! Have fun with toppings too! I used a simple powdered sugar topping for my bundt cake, but you can top with a salted caramel sauce, maple syrup frosting, the list goes on. There’s very few pieces of the baking process you can “play around with”, but the flavors are DEFINITELY one of them!

Fun Fact: Whenever I think of bundt cake, I can’t help but laugh. All the comes to mind is that scene in My Big Fat Greek Wedding when Toula’s mother doesn’t know what a bundt cake is and she “fixes” the hole in the cake with a potted flower. Such a great movie!

big fat greek wedding

Photo from Half a Tablespoon

Pumpkin Bundt Cake

finished slice

Prep Time:  30 Minutes
Cook Time: 1 Hour
Total Time: 1 Hour, 30 Minutes + cooling time
Yields: 12 – 14 servings

What You’ll Need:

  • 3 1/4 Cups of All-Purpose Flour
  • 2 Tsp of Baking Powder
  • 3 Tsp of Ground Cinnamon
  • 2 Tsp of Ground Cloves
  • 2 Tsp of Ground Nutmeg
  • 1 Tsp of ground allspice
  • 1/2 Tsp of Baking Soda
  • 1/2 Tsp of Salt
  • 2 3/4 Cups of Granulated Sugar
  • 1 Cup of Vegetable Oil
  • 4 Large Eggs
  • 1 Can (15 Ounces/1 3/4 Cups) of Pumpkin Puree

Instructions:

  1. Preheat the oven to 350 degrees F and arrange the rack in the middle. Coat the 12-cup Bundt Pan with melted butter and coat lightly with flour. Tap out any excess flour. Set aside.
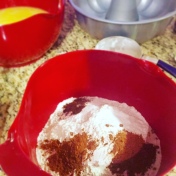
  2. Combined dry ingredients: Flour, Baking Powder, Baking Soda, Cinnamon, Cloves, Allspice, Nutmeg and Salt in a large bowl. Whisk until combined and any clumps are broken up.
    dry ingredients
  3. Using the paddle attachment to your standing mixture (or just handheld), mix the sugar and oil on medium speed until the sugar is incorporated. This will take roughly 1 minute. Scrape down the sides of the bowl.
  4. Return the mixer to medium speed, add the eggs, one at a time, beating well between each addition.
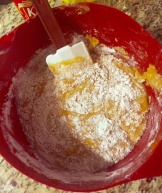
  5. Reduce the speed to low and add in the pumpkin. Beat until just combined, roughly 30 seconds. Scrape down the sides of the bowl.
  6. This step, I prefer to use a hand held silicone spatula, but you can keep using the standing mixer on low speed if you desire. Fold the flour mixture, in 3 batches, into the pumpkin mixture until just incorporated. Scrape the bottom of the bowl to make sure all of the flour has been mixed.
    add flower
  7. Pour the batter into the prepared pan and bake until a toothpick comes out clean, roughly 1 hour to 1 hour and 10 minutes depending on your oven.
  8. Remove the pan to a wire rack and let cool for 15 minutes. Turn the cake out onto the wire rack and let it cool completely.
    Un sugared
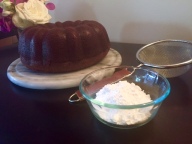
  9. You’re now ready to top with whatever your heart desires! I picked powered sugar:

finished uncut   Finished Cut   finished slice

Enjoy!
Kristin

A Delicious Duo

21 Sep

Peanut Butter Blossoms

If you ask me, there’s nothing more delicious than the pairing of chocolate and peanut butter. I was looking for something quick and simple to bring to a family party this past Friday and was flipping through some old recipes, browsing pictures online and chatting with some colleagues. We got onto the topic of cookies and figured maybe I’d just settle with my classic chocolate chip (not that chocolate chip cookies are “settling”! I could eat them all day long!!), but I wanted to mix it up a bit. I haven’t made these cookies in probably over a decade… aka WAY too long ago and I was reminded just how easy and quick they are to make.

Needless to say, they were a huge hit! Even my Nana who “doesn’t like peanut butter”, which I’m not sure how that’s possible (Love you Nana!) now has decided that she in fact, does love it! I did question whether that was just her response given I am her grandchild, but on her 3rd cookie, she convinced me! The cookies were gone long before the night was over and the sangria continued to flow. All around great night with family!!Nana

Nana & Me!

Blossoms

final 3 strait

Prep Time: 20 Minutes
Cook Time: 10 Minutes
Total Time: 30 Minutes
Yields: 35 Blossoms

What You’ll Need:

  • 35 Unwrapped Hershey Kisses – Milk Chocolate
  • 1/2 Cup of Shortening
  • 3/4 Cups of Jiff Creamy Peanut Butter
  • 1/3 Cup of Granulated Sugar (+1/3 Cup for rolling)
  • 1/3 Cup of Packed Light Brown Sugar
  • 1 Egg
  • 2 Tablespoons of Whole Milk
  • 1 Teaspoon of Vanilla Extract
  • 1 1/2 Cups of All-Purpose Flour
  • 1 Teaspoon of Baking Soda
  • 1/2 Teaspoon of Salt

Instructions:

  1. Preaheat the oven to 350 Degrees F and remove the wrappers from the chocolates. Place in a bowl and set aside
  2. In a medium bowl, mix the flour, baking soda and salt until combined. Set aside
  3. Beat (with the paddle attachment if using your mixer) the shortening and peanut butter in a large bowl until well blended
  4. Add 1/3 Cup of granulated sugar and the brown sugar and beat until fluffy. Roughly a minute or two.
  5. Add the egg, milk and vanilla. Beat until incorporated
  6. Slowly add the flour mixture into the peanut butter mixture. Add in 3 batches and beat after each addition until combined.
  7. Using your hands, scoop out a tablespoon of dough and shape into 1-inch balls. Roll each ball in the additional 1/3 granulated sugar (if desired, but who wouldn’t love the extra sugar!?) and place on an ungreased cookie sheet. Don’t be deceived, they will grow in size while they bake. Keeping them on the smaller size makes them the perfect bite-sized treat!
    in the sugar    before the oven
  8. Bake the rounds for 10 – 12 minutes, depending on your oven, until they are lightly browned.
  9. Remove from the oven and immediately press a chocolate kiss into the center of each cookie. The cookie will crack around the edges, so that’s OK!
    out of the oven
  10. Remove from the cookie sheet and allow them to cool completely. Full disclosure: I love eating these when they’re still warm and the chocolate kiss is still soft! They melt in your mouth and you’ll want at least 15 more!!

With football season in full force and hockey season right around the corner.. oh and baseball still on TV, this is is the perfect Sunday Funday treat to share with your friends and family. I hope you enjoy them as much as my family does!

Fianl 9

Enjoy!
Kristin

New York Style

10 Sep

Classic Strawberry Cheesecake

whole thing side

I’m going to come right out and be up front here… I don’t like Cheesecake. I know, general statement. I’ve only tried a couple different kinds. Typically, my goal when I don’t like a certain dessert is to find a way to make it so that I do like it. The New York Style Strawberry Cheesecake however, is an exception. You just don’t mess with it, kind of like New Yorkers in general.

There are several different variations on how to make Cheesecake, from ingredients to oven techniques. I’ve tried 2:

  1. No Water Bath
  2. Variation of the water bath
    *Water bath is cooking the cheesecake by placing the spring-form pan inside a roaster/pot of boiling water. it helps to regulate the temperature and protect the cheesecake while it is cooking.

The first one I made with no water bath came out burnt on the top, the crust was overcooked and it was slightly uneven. For the water bath method, rather than putting the spring-form pan directly in the pan of water, I placed a pot of water on the rack directly below and the cheesecake came out beautiful!

Another trick I found to keep the top smooth: do not use convection bake on the oven, just use regular bake. I made this mistake on my first cheesecake as well which was one of the causes of the unevenness. As you work through the recipe there will be some additional tips along the way. Hopefully at the end you’ll have a dreamy and delicious dessert to share!

Classic Cheesecake

From the top

What You’ll Need:
Crust:

  • 1 3/4 Cups of Graham Cracker Crumbs (~9 Graham Crackers)
  • 3 Tablespoons of Granulated Sugar
  • Pinch of Salt
  • 1/2 Stick (4 Tablespoons) of Unsalted Butter, Melted

Cheesecake:

  • 2 Pounds (Four 8-ounce boxes) of Cream Cheese, at room temperature – I used the Philadelphia Cream Cheese that are the solid, rectangular boxes. The cream crease in the tubs have air whipped into them and won’t work the same way as traditional blocked cream cheese
  • 1 1/3 Cups of Granulated Sugar
  • 1/2 Teaspoon of Salt
  • 2 Teaspoons of Pure Vanilla Extract
  • 4 Large Eggs, at room temperature
  • 1 1/3 Cups of Sour Cream or Heavy Cream, or a combination of the two:  The sour cream will give you a tangier cheesecake, which is a more traditional “New York Classic”, while the heavy cream is milder. As long as you keep the measurement at 1 1/3 cups, you can use whatever combo of the two you’d like

Strawberry Topping:

  • 1 Cup of Sliced Strawberries
  • 1/4 Cup of Light Brown Sugar
  • Pinch of Salt
  • 1/2 Cup of Strawberry Jam
  • 1 Tablespoon of Lemon Juice

Instructions: 

  • Crust
  1. Preheat the oven to 350 degrees F and center the rack in the oven
  2. Butter the bottom and sides of your spring form pan and place a fitted piece of parchment paper on the bottom.  I used a 10.25-inch Spring-form pan, but you can also use a standard 9-inch. Just make sure the sides of the pan are at least 2 3/4-inches high (if they’re lower, you’ll have some batter leftover).
  3. Use a food processor to breakup the graham cracker into crumbs and mix together with the sugar and salt in a medium sized bowl.
  4. Pour the melted butter over the mixture and stir with a fork until all of the dry ingredients are uniformly moist.
  5. Turn the ingredients into the buttered spring-form pay and pat an even layer of crumbs along the bottom of the pan. You can use the bottom of a drinking glass or measuring cup to flatten out the crust to get a uniform layer.
  6. Place the spring-form pan on a baking sheet and bake for 10 minutes. The sides of the crust should be just browning slightly when it’s done.
  7. Set the crust aside to cool on a rack while you make the cheesecake.

crumbs

  • Cheesecake
  1. Reduce the oven temperature to 325 Degrees F and put a kettle of water on to boil
  2. Working with a standing mixer fitted with a paddle attachment, beat the cream cheese at medium speed until it is soft, roughly 4 minutes. With the mixer still running, add the sugar and salt and continue to beat for an additional 4 minutes until the cream cheese is light. You’ll start to see the creamy nature really come through here. Scrape down the sides of the bowl.Kitchen Aide
  3. Beat in the vanilla and add the eggs, one by one, beating for a full minute after each addition — you want a well-aerated batter, but not over-beaten. Scrape down the sides of the bowl.
  4. Reduce the mixer to low speed and stir in the sour cream and/or heavy cream
  5. Take the bowl off the mixer and give the batter a few stirs with the rubber spatula, just to make sure nothing has been left unmixed at the bottom of the bowl. cheese cake and crust
  6. Make sure the sides of the spring-form pan are well greased and scrape the batter into the pan
  7. Pour the boiling water into a large pot or roasting pan and place it in the oven on the bottom rack.  This will regulate the baking temperature since the temperature of water never exceeds boiling point (it turns into steam), it keeps the cheesecake baking at an even, slow temperature. This prevents the cheesecake from overcooking (especially around the edges). the steam created further protects the baking as it keeps the air in the oven moist and humid to prevent the top of the cake from drying out and cracking. 
  8. Place the spring-form pan on the center rack, just above the pan of water and bake for 1 hour and 30 minutes. Now, no matter how tempted you are, DO NOT OPEN THE OVEN! Any slight change in temperature will cause cracks in the cheesecake or allow it to sink in the middle. 
  9. Turn off the oven after the 1.5 hours and prop open the oven door for 30 minutes to 1 hour and let the cheese cake cool slowly. You’ll see that the cake is done when the sides are sturdy, but the middle wiggles a little.
  10. Carefully take the pan out of the oven and let it come to room temperature on a cooling rack
  11. Once the cake is cool, cover the top lightly with plastic wrap and chill it in the fridge for at least 4 hours or overnight which is better
  • Strawberry Topping
  1. In a large bowl, toss together the sliced strawberries and the sugar. Let it sit for 30 minutes, stirring occasionally
  2. Whisk the jam until completely smooth and place in a small saucepan. Bring to a simmer over medium-high heat, stirring frequently until the jam is dark and no longer frothy, about 3 minutes. Stir in the lemon juice.
  3. Pour the jam mixture over the strawberries and stir to combine
  4. Allow the mixture to cool to room temperature, then cover with plastic wrap and refrigerate until cold, at least 2 hours

To Serve

To un-mold the cheesecake, wrap a hot kitchen town around the outside of the pan and hold in place for 1 minute. Using a sharp knife, move around the edges of the cake to make sure it is separated from the sides of the pan. Remove the sides and then slide a thin metal spatula between the crust/parchment paper and the bottom of the pan to loosen, then slide the cheesecake onto a serving platter. If you prefer, you can also leave the metal bottom under the cake and place it on the serving plate (for a first time, it’s definitely the safe way to go!). Let the cheesecake sit at room temperature for 30 minutes before serving. Drizzle the strawberry topping over the slice and drift away in a dreamy, creamy cheesecake!

Distance Slice

Enjoy!
Kristin

Design a site like this with WordPress.com
Get started